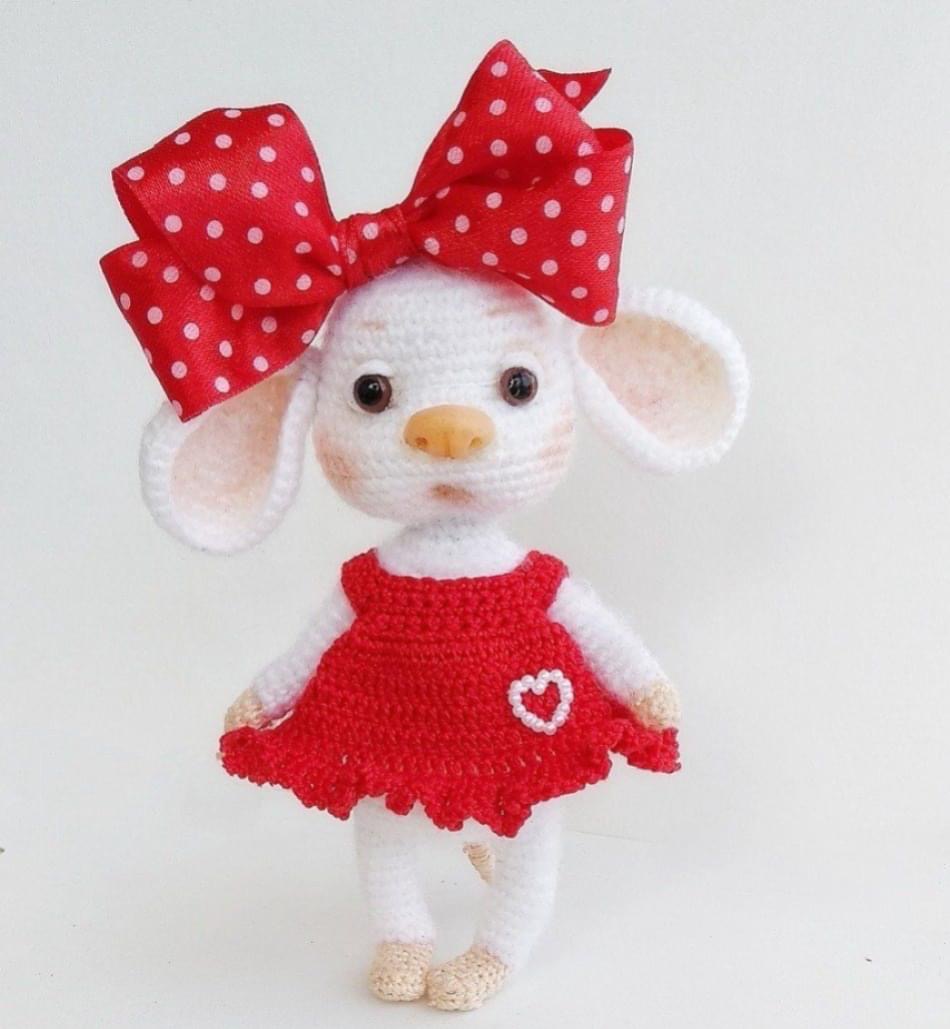

The size of the toy will depend on the yarn and hook size you choose. The author crocheted this girl mouse using YarnArt Bella Baby and a Clover 1 mm hook, resulting in a mouse about 12 cm tall. If you use YarnArt Jeans with a Clover 1.5 mm hook, the height will be around 15 cm.
Abbreviations:
- КА – amigurumi ring
- sc – single crochet
- inc – increase (crochet 2 stitches in one loop)
- dec – decrease (crochet two stitches together)
- ch – chain stitch
Head
1 — 6 sc into KA
2 — 6 inc (12)
3 — (1 sc, inc) * 6 (18)
4 — (2 sc, inc) * 6 (24)
5 — (3 sc, inc) * 6 (30)
6 — 30 sc
7 — (4 sc, inc) * 6 (36)
8-9 — 36 sc
10 — (5 sc, inc) * 6 (42)
11 — 42 sc
12 — (6 sc, inc) * 6 (48)
13-16 — 48 sc
17 — (2 sc, dec) * 12 (36)
18 — (dec, 1 sc) * 12 (24)
19 — 24 sc
20 — (1 sc, dec) * 12 (18)
21 — 18 sc, finish, leave yarn for sewing.
Upper Arms (2 pieces)
Chain 4 ch, starting from the second chain from the hook:
1 — (inc, 1 sc) * 2, inc (8), continue crocheting in a spiral
2-12 — 8 sc, fasten and cut the yarn.
Lower Legs (2 pieces)
Chain 5 ch, starting from the second chain:
1 — inc, 3 sc, 3 sc in the last stitch, 2 sc (9), continue crocheting in a spiral to the desired leg length (15-17 rows of 9 sc).
For the 1st leg, fasten and cut the yarn. Use the yarn from the 2nd leg to continue crocheting the body.
Chain 6 ch to connect both legs, and then crochet 9 sc on the second leg, 6 sc on the chain, 9 sc on the first leg, 3 sc on the chain (30).
Place a marker (it should always be in the center of the back) and continue crocheting the body:
1 — 30 sc, you can insert a frame and stuff the legs, but do not stuff the feet.
2 — 12 sc, 6 inc, 12 sc (36)
3-9 — 36 sc
10 — (4 sc, dec) * 6 (30)
11-15 — 30 sc
16 — 9 sc, 6 dec, 9 sc (24), in the next row, join the upper arms.
17 — 6 sc on the back, 8 sc on the arm, 12 sc on the chest, 8 sc on the other arm, 6 sc on the back (40)
18 — 5 sc, dec, 6 sc, dec, 10 sc, dec, 6 sc, dec, 5 sc (36)
Insert a frame into the arms, stuff the arms lightly. Remember to stuff the body as you crochet.
19 — (4 sc, dec) * 6 (30)
20 — (3 sc, dec) * 6 (24)
21 — 24 sc
22 — (2 sc, dec) * 6 (18)
23 — 18 sc, finish, secure the yarn.
Ears (2 pieces)
1 — 6 sc in KA
2 — 6 inc (12)
3 — (1 sc, inc) * 6 (18)
4 — (2 sc, inc) * 6 (24)
5 — (3 sc, inc) * 6 (30)
6 — (4 sc, inc) * 6 (36)
7 — 36 sc, finish, leave yarn for sewing.
Tail
You can crochet and sew the tail, or wrap wire with yarn. I won’t delve into this, as there are many tutorials online on this topic.
Assembly and Finishing
I shape the eyes between rows 9 and 10 of the head, about 6-8 stitches apart. The mouth is shaped between rows 15-17. You can adjust these placements as you like.
I sew the ears around row 6-7 of the head, but you can choose where you prefer them.
The limbs can be started with a different color yarn, again as you prefer, and switch back to the main color when needed. The tail can also be customized.
As for clothing, I won’t describe it, as everyone can dress their mouse to their own taste and color.
Some may choose not to use a frame; in that case, simply reduce the number of rows for the lower legs to fit the foot size—about 5-6 rows—and stuff the legs and the entire mouse more firmly.
by Marina Chirkova.
Enjoy!