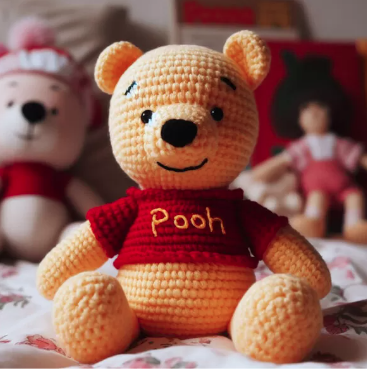
In the cozy nooks of amigurumi land, the Winnie the Pooh amigurumi sits sweetly, bringing A.A. Milne’s cherished storybook bear to life with the warmth of handmade craft. This cuddly version of Pooh, with his soft golden-brown hues and bright red shirt, is a hug of nostalgia, a throwback to the sunny days spent in the Hundred Acre Wood. Each stitch and loop lovingly constructs his round tummy, fond of honey, and his kind, gentle eyes, bringing joy to fans of all ages who hold the silly old bear dear to their hearts.
The art of creating a Winnie the Pooh amigurumi is a delightful journey through the stitches of time and memory. Crocheters weave not just yarn but also the sweetness of Pooh’s simple wisdoms and adventures with his friends. Crafting his plump body, his cozy shirt, and his amiable expression is a venture filled with the same tranquility that Pooh himself might find in a jar of honey or a breezy day beneath the beech trees. Each finished amigurumi is a testament to Pooh’s ability to turn even the smallest task, like humming a tune or sharing a pot of honey, into something quite special.
Should you feel inspired to embark on the whimsical task of creating this beloved bear, the Winnie the Pooh amigurumi pattern will serve as your guide through the Hundred Acre Wood of crochet. The pattern details each aspect of Pooh, from his curious ears to his rumbly tummy, ensuring that the endearing simplicity of the bear of very little brain is captured perfectly. As you pick up your hook and yarn, you’re not just making a toy; you’re spinning a thread of childhood magic into a form that can be embraced with every squeeze. The Winnie the Pooh amigurumi pattern awaits below, ready for you to bring a piece of the enchanting forest into your own home.
Materials:
- Yellow yarn (for the body)
- Red yarn (for the shirt)
- Black yarn (for the details)
- Crochet hook (3mm or size needed to obtain tight stitches)
- Fiberfill or stuffing
- Yarn needle
- Stitch marker
- Safety eyes (6mm) or black yarn for embroidery
- Black embroidery floss (for the eyebrows and mouth)
- Scissors
Abbreviations:
- ch: chain
- sc: single crochet
- inc: increase (2 sc in the same stitch)
- dec: decrease (sc 2 together)
- BLO: back loop only
- FLO: front loop only
- st(s): stitch(es)
- sl st: slip stitch
- rnd(s): round(s)
Body and Head (One Piece):
- Using yellow yarn, start at the bottom of Pooh’s body with a magic ring.
- Rnd 1: 6 sc in magic ring (6)
- Rnd 2: Inc in each st around (12)
- Rnd 3: [Sc in next st, inc in next st] repeat around (18)
- Rnd 4: [Sc in next 2 sts, inc in next st] repeat around (24)
- Rnd 5: [Sc in next 3 sts, inc in next st] repeat around (30)
- Rnd 6: [Sc in next 4 sts, inc in next st] repeat around (36)
- Rnds 7-13: Sc in each st around (36)
- Rnd 14: [Sc in next 4 sts, dec] repeat around (30)
- Rnd 15: Sc in each st around (30)
- Rnd 16: [Sc in next 3 sts, dec] repeat around (24)
- Rnd 17: In BLO, sc in each st around (24)
- Rnd 18-24: Sc in each st around (24). Begin stuffing the body.
- Rnd 25: [Sc in next 2 sts, dec] repeat around (18)
- Rnd 26: Sc in each st around (18). Continue stuffing the body.
- Rnd 27: [Sc in next st, dec] repeat around (12)
- Rnd 28: In FLO, sc in each st around (12) Transition to the head now.
- Rnd 29: [Sc in next st, inc] repeat around (18)
- Rnd 30: [Sc in next 2 sts, inc] repeat around (24)
- Rnd 31: [Sc in next 3 sts, inc] repeat around (30)
- Rnd 32: [Sc in next 4 sts, inc] repeat around (36)
- Rnd 33: [Sc in next 5 sts, inc] repeat around (42)
- Rnds 34-43: Sc in each st around (42)
- Insert safety eyes between Rnds 40 and 41 about 7 sts apart.
- Rnd 44: [Sc in next 5 sts, dec] repeat around (36)
- Rnd 45: [Sc in next 4 sts, dec] repeat around (30)
- Rnd 46: [Sc in next 3 sts, dec] repeat around (24). Start stuffing the head.
- Rnd 47: [Sc in next 2 sts, dec] repeat around (18)
- Rnd 48: [Sc in next st, dec] repeat around (12)
- Rnd 49: Dec around (6)
- Fasten off, leaving a long tail. Finish stuffing the head firmly and close the opening.
Shirt:
- Using red yarn, attach to the BLO of Rnd 17 of the body.
- Rnd 1: Ch 1, sc in same st and around, sl st to first sc to join (24)
- Rnd 2-5: Ch 1, sc in each st around, sl st to first sc to join (24)
- Fasten off and weave in ends.
Arms (Make 2):
- Start with yellow yarn and a magic ring.
- Rnd 1: 6 sc in magic ring (6)
- Rnd 2: [Sc in next st, inc] repeat around (9)
- Rnd 3-10: Sc in each st around (9)
- Stuff lightly, fold the opening flat, and 4 sc through both layers to close.
- Leave a long tail for sewing and attach to the body at about Rnd 22.
Legs (Make 2):
- Start with yellow yarn and a magic ring.
- Rnd 1: 6 sc in magic ring (6)
- Rnd 2: Inc in each st around (12)
- Rnd 3-4: Sc in each st around (12)
- Fasten off, leaving a long tail for sewing. Attach to the bottom of the body, symmetrically.
Ears (Make 2):
- Start with yellow yarn and a magic ring.
- Rnd 1: 4 sc in magic ring (4)
- Rnd 2: Inc in each st around (8)
- Rnd 3-5: Sc in each st around (8)
- Fasten off, leaving a long tail for sewing. Flatten the ears and sew them on top of the head between Rnds 37 and 43.
Finishing Touches:
- Use black embroidery floss to stitch the eyebrows above the eyes.
- Embroider a nose with black yarn in a triangle shape between the eyes.
- Use black embroidery floss to create Pooh’s smile below the nose.
Notes:
- Make sure to stuff all parts firmly to maintain the shape.
- Adjust the placement of the facial features according to your preference.
- Weave in all ends securely.
Enjoy your crochet Winnie the Pooh Amigurumi! Remember, this pattern is a guide, so feel free to make adjustments as you see fit to personalize your creation.